This was last updated in 2019 after it was published and confirmed to work with up to, and including, Raspbian Buster Lite + macOS Mojave. At the time, I setup a Raspberry Pi Zero W from scratch to confirm these exact steps still worked, however I have since passed along my rPi Zero W to someone else so I cannot support this article with newer Raspbian versions. I might pick up another rPi Zero if they release a new version in the future, at which time I will update this post. That said, I highly recommend replacing some of the manual setup steps in this post by using rpi-imager instead!
This setup requires no monitor, or external keyboard, not even the OTG USB cable (I it bought because I thought I needed it).
Prerequisites #
If you’re reading this you’re probably here to learn how to get a Raspberry Pi Zero W running headless Raspbian and connected wirelessly to the internet all while using macOS. I will refer to the Raspberry Pi Zero W as simply “rPi” from here on out.
Ok, let’s get started. There’s a few things you’ll need:
- A copy of the Raspbian Lite image
- An 8GB+ MicroSD card (and some way to plug it into your computer in order to flash an image to it)
- A micro USB cable (to plug the rPi into your computer temporarily)
- A 2.4Ghz wifi access point (the rPi Zero W doesn’t support 5Ghz which I learned the hard way 😞 )
If you have all of these things, great! If not, order all the parts quickly on BuyAPi or another site of your choice, then continue reading as if you have them in hand.
Preparing the SD card #
Start off by plugging the SD card into your computer. Once it is mounted you’ll want to unmount it so that it can have the Raspbian image written to it. This seems un-intuitive if this is your first time, but stay with me here!
To unmount the drive and prep it for writing the image, run the following:
sudo df -h # Use the output of this to determine <diskname> in the next command
sudo diskutil unmount /dev/<diskname>
#  OR
sudo diskutil unmountDisk /dev/<diskname>
Once the above command completes, continue to the next step.
Writing the image to the SD card #
Run the command below to start writing the image to the SD card:
sudo dd bs=1m if=/path/to/raspbian-lite.img of=/dev/rdisk2
# Where rdisk2 is the number of the disk from earlier
The command above should only take a few minutes depending on the size of the SD card. After it completes you’ll need to do a few things:
-
Start by opening your terminal and running
touch /Volumes/boot/ssh. The existence of this empty file in the root of the drive will enable SSH on first boot when we connect it with the USB cable. -
Next, run
touch /Volumes/boot/avahi. This creates a file that triggers theavahi-daemonto start on boot which allows the rPi to be used inethernet gadget mode(ie, USB tethering for ssh access). -
Then, append
dtoverlay=dwc2to the end of the/Volumes/boot/config.txtfile on a new line. -
Now, open
/Volumes/boot/cmdline.txtand insertmodules-load=dwc2,g_etherafter therootwaitentry following the same space-delimited pattern as the rest of the file.
Once you’ve completed the steps outlined above, eject the disk from Finder and plug it into the SD card slot in the rPi.
First boot into the OS #
Connect the USB cable to your computer and then to the OTG USB port the board (not the power port on the right).
[IMAGE HERE of the board]
Once connected, give the rPi about sixty seconds to boot up.
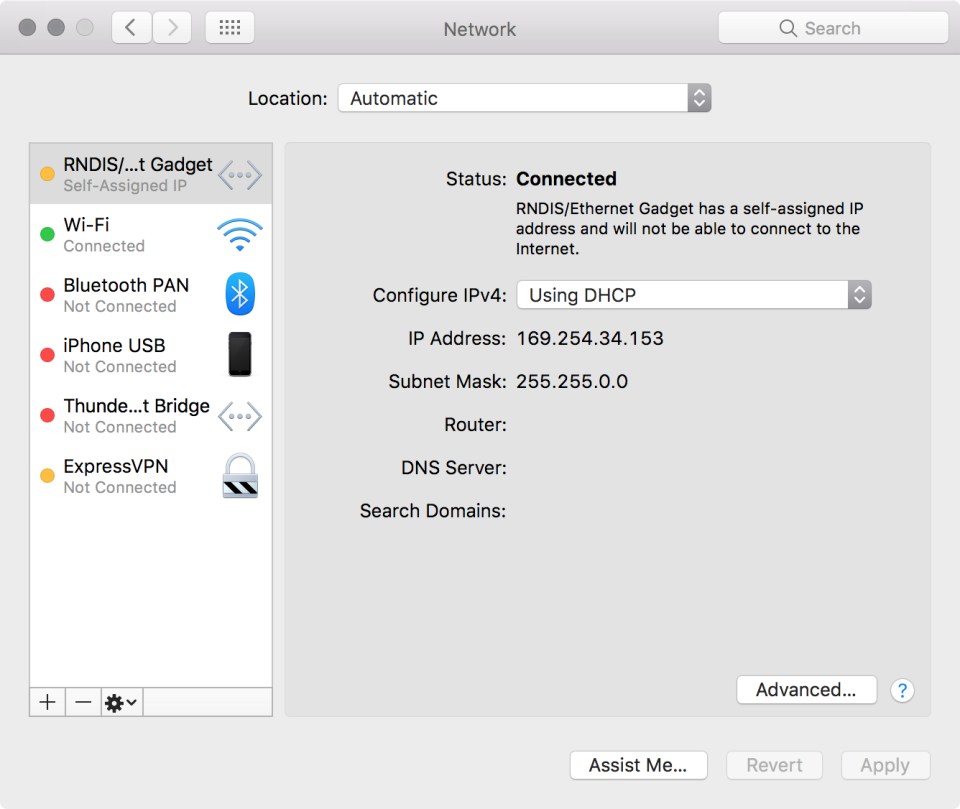
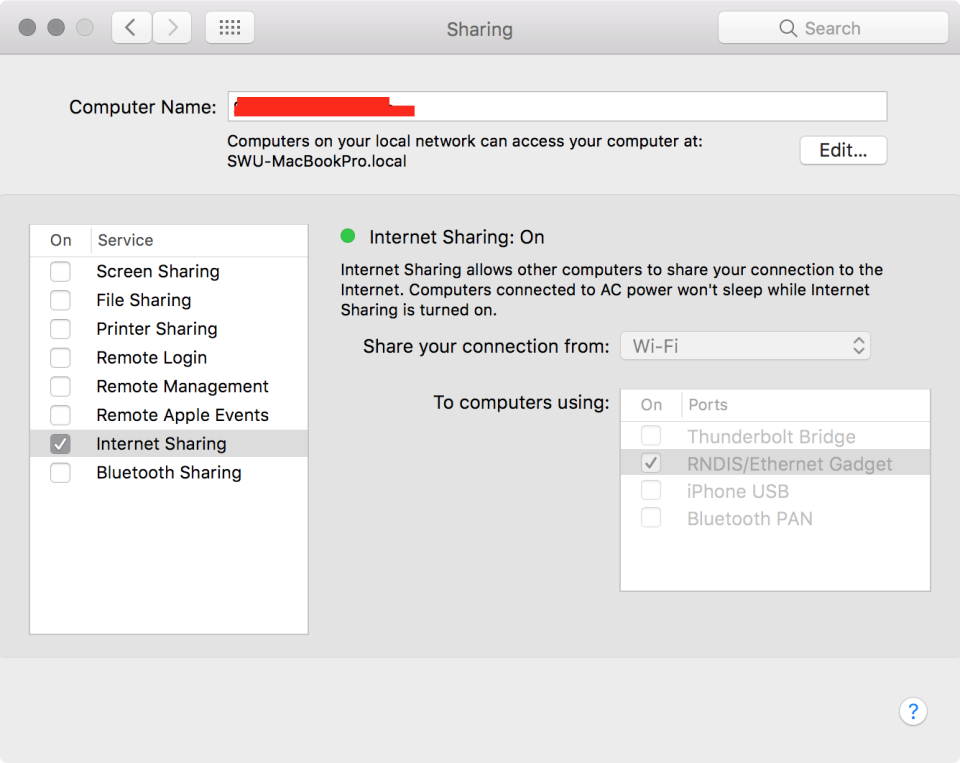
Next, open System Preferences -> Network in macOS and you’ll notice there is a new RNDIS/Ethernet Gadget network adapter added in the list. It will probably show up with a 169... IP address so you’ll need to head to System Preferences -> Sharing now to enable “Internet Sharing” for the RNDIS/Ethernet Gadget adapter.

macOS Network Adapters
Make sure you check the correct boxes as illustrated below:

macOS Network Sharing Configuration
Once you have local network access to the rPi, you can ssh in with:
ssh pi@raspberrypi.local
NOTE: The password will be the default one that ships with the distribution.
SSH into the RaspberryPi #
Once you’re ssh’d into the rPi, you can setup the wifi so that being connected via USB is no-longer required.
In order to get the right configuration for your wifi, run the wpa_passphrase utility with your SSID and it will ask for your password:
wpa_passphrase "SSID HERE"
# You will be prompted to enter your password.
# The utility should generate something like:
#   network={
#     ssid="SSID"
#     #psk="PASSWORD"
#     psk=...
#   }
NOTE: If you have a wifi setup that isn’t using WPA2-PSK/TKIP encryption, you will need to do some research into the config values for wpa_supplicant. A useful config value to add here is if you have a hidden 2.4G wireless network: scan_ssid=1.
Copy the output of the command above into the /etc/wpa_supplicant/wpa_supplicant.conf file and overwrite whats in the network={...} section, or if the section doesn’t exist append it to the end of the file.
sudo nano /etc/wpa_supplicant/wpa_supplicant.conf
NOTE: If you don’t want to use nano, feel free to install another editor like vim at this point before continuing
After pasting the output, save and exit the file. wpa_supplicant should pick up on the changes to the file and connect to the wifi automatically.
You can confirm that your rPi has connected to your wifi by running sudo ifconfig wlan0. In the output, look for inet addr:... which should display an ip address. If this looks correct, then your rPi is connected to your DHCP server/router.
The other option is by checking in the GUI of the router itself in your browser to see if the router issued an IP address to the rPi.
Update the system #
Once the rPi is connected to the wifi, the first thing you should do is update the apt-get package cache and upgrade the Raspbian distribution as there are undoubtedly some security packages between the image creation and the time you install it on your rPi.
sudo apt-get update -y
sudo apt-get upgrade -y
sudo apt-get dist-upgrade -y
At this point you’ll want to turn off the avahi-daemon that we enabled in the initial SD card setup. You can do so by running:
systemctl disable avahi-daemon
Finishing notes #
Once you’d completed the above steps, you should now have a functioning Raspberry Pi Zero W connected to the internet! From here you can check out some of the resources I’ve compiled to take your rPi to the next level.
Optional things to do after setup #
- Setup an MOTD
- Install nodejs with nvm
- Install homebridge