[March 2021 UPDATE] Revisited — Since posting this, a bunch of new tech has been released and over one year into the world-wide pandemic for COVID-19 our lives have fundamentally changed (for the better in some instances, not so in others). I have revised some of the sections and updated the content to reflect alternative offerings since the original publish date. Most notably is the addition of webcam software available from most major camera manufacturers.
In this post I’m going to show you how you can turn a drab-looking webcam video feed into one that will have people you know talking. The solution that I propose could be used for a multitude of scenarios: remote conferencing, “talking head” style video tutorials, and even live-streaming on Twitch or other platforms. The possibilities are up to you as a creator of content and how you choose to use it. Even without a green screen, I basically have all the parts to run my own Twitch channel, minus the skill and the audience… 😅
Over the years and having worked semi-remote at a few companies, I’ve migrated from built-in camera and mic for meetings, to using an external webcam to better display my face and surroundings and then later incorporated an external microphone for better audio. Once I reached a happy medium I didn’t really tweak my setup for awhile.
Before I started on this journey, my initial remote meeting setup included:
- a Logitech C920 webcam
- an Audio-Technica AT2005USB USB microphone (which was purchased back in 2015 for a failed podcast project)
This setup worked for me, but I noticed on particularly bright days that the webcam video quality would get washed out and it became almost unusable. This is mostly due to the fact that my desk is directly in front of a window (due to space constraints in my home office). After living with this for some time and tweaking the Logitech camera settings a bit to try and compensate, I decided that upgrading my camera was the only option and necessary to improving the video quality any further than any changes to settings within software could allow.
My original setup with only the Logitech C920 camera looked something like this image:
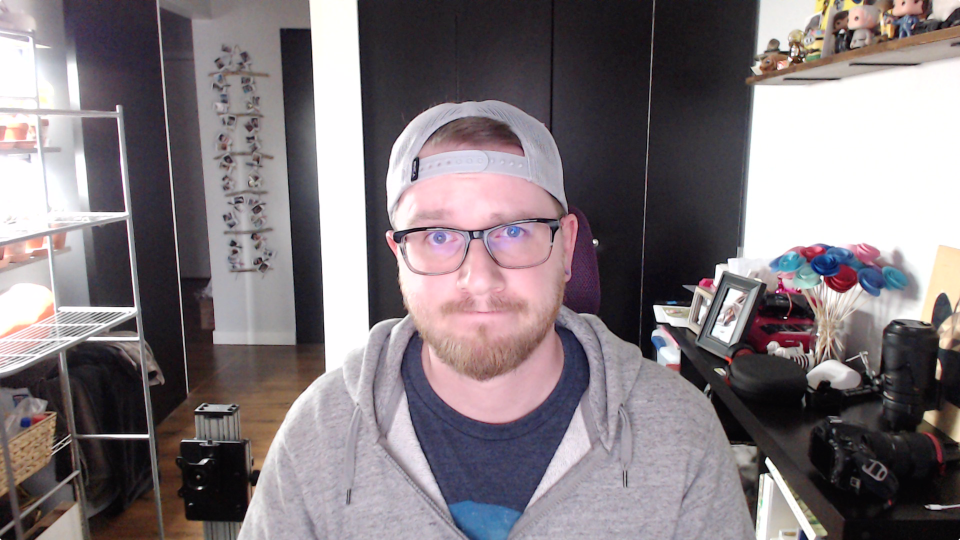
Logitech C920 view
and with a new camera and some dimmable bi-colour LED lights and diffusers, I turned it into this:
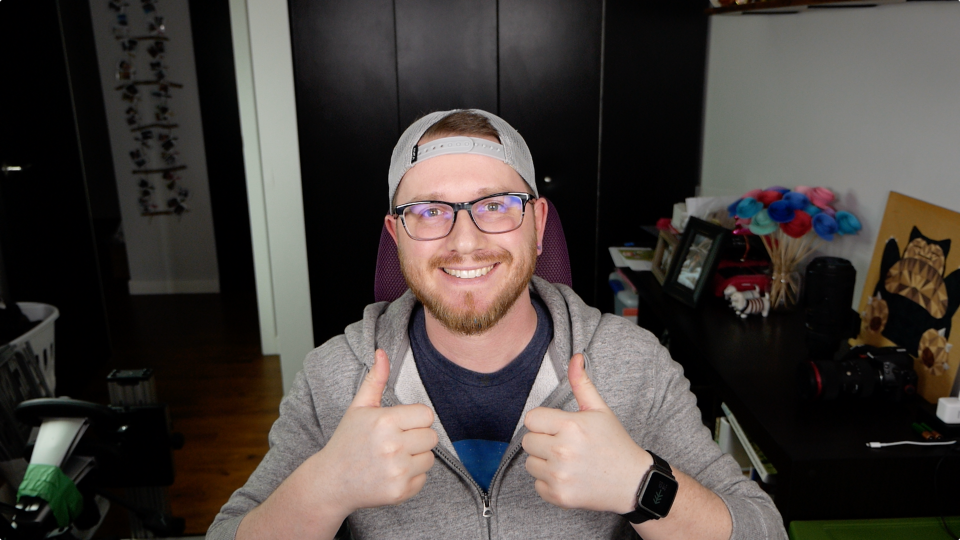
Lumix G85 with 12-35mm @ f2.8 + Elgato Cam Link 4K view
Instantly, a few things happened:
- the white balance in the image was no-longer shifted to an odd temperature compared to the webcam
- the quality of the image drastically improved because of the larger camera sensor and better lens
- using a camera lens with a low aperture (f stop or 𝑓 number) creates a softer background, allowing the viewer to focus on me and not what’s going on behind me
My Current Setup #
My current setup is running macOS 10.14.6 Mojave on a MacBook Pro 15” 2018 (supplied by my employer), so your mileage may vary using another machine/operating system. I’m fairly certain this setup could run almost the exact same on Windows, and I might even try to set that up eventually so I can verify.
I owe a lot of thanks to a video from one of my favourite YouTubers DSLRVideoShooter, this post by Matt Stauffer, and the setup that Kent C. Dodds uses.
It also helps that I was already interested in videography and identify as an amateur photographer, so I understand the importance of light in a scene, the quality of the glass on the camera, and the capabilities of the camera sensor.
Parts list #
Below is a list of parts I’ve compiled based on my Amazon order history for this project. I bought everything roughly around the same time to put this all together.
- DSLR or mirrorless camera
- Elgato Cam Link 4K — used to connect the camera to the MacBook/computer, acting as a USB webcam interface
- NEW Atomos Connect — Almost exactly the same as the Cam Link 4K, but less expensive, I own one now and it’s a great alternative if you’re looking to save a bit of money while getting a quality HDMI-to-USB adapter
- Dual monitor desktop mount — used to hold up my monitors, at a great price
- Single monitor desktop mount — used as a somewhat free-standing camera mount that can swing around the desk with relative ease rather than remaining a fixed position forever
- Some 3/8-inch and 1/4-inch tripod screws — used to attach the monopod extension to the single monitor mount arm
- some screw/nut washers — to give some height to the tripod screw so the threading doesn’t go too far inside the monopod extension
- Monopod extension pole — attaches to the single monitor mount arm with a screw from above
- Mini ball head — goes on top of the monopod extension pole
- Dimmable bi-colour LED lights and diffusers — used to provide nice soft lighting
A DSLR or Mirrorless Camera #
For this project, I used a Panasonic Lumix G85 mirrorless camera which I already had for videography, but you can find other cameras that will also work so long as they have an HDMI output. This is a camera with a micro four thirds sensor, and I can swap the lens out for others should I need to. If you pick up the Lumix G85 with the kit lens (12-60mm f3.5-5.6), it would be more than enough.
The lens that is currently mounted on the camera right now is the amazing Panasonic Lumix G X Vario 12-35mm II f2.8. This lens has a steep price tag when purchased brand new for a simple webcam project like this, but I purchased mine used from a local camera store for almost half the price of a new lens. If the cost of a new camera body or lens fills your soul with dread, try looking into the used market of cameras. I purchase almost all of my lenses used from my local camera store who has had time to inspect and test the equipment before resale.
If you don’t pick the Lumix G85 and decide you want a different camera, you’ll want to pick a fairly light (in weight) body as large camera bodies with bulky lenses will cause unnecessary strain on the parts holding it up. You don’t want them falling randomly in the middle of the night onto the floor from this height.
A significant factor in the decision to purchase a camera is whether or not it has HDMI-out, and also whether it offers a “clean” HDMI feed. You may also need an adapter from HDMI to mini- or micro-HDMI for your camera. Another factor is whether you want to use a battery or purchase a “dummy battery” for it and have the camera powered from an electrical outlet.
Once you’re able to connect an HDMI cable to your camera somehow, be it through an adapter or a dongle, move onto the next section.
HDMI to USB #
The one piece of tech that allows us to use the camera like a webcam is the Elgato Cam Link 4K which I picked up recently. It’s a bit pricey, but the functionality is what makes this a great buy: virtually any HDMI signal you plug in to the Cam Link will show up in your settings as if it were a USB webcam 🤯 with no extra software required.
The way it works in practice: plug the HDMI cable coming from your camera into the HDMI port on the back end of the Cam Link 4K, then plug the USB end into your computer. In my case I need a USB 3.x to USB Type-C adapter for this.
Caveat: I’ve seen some chatter around the internet about the Cam Link 4K not working unless it is plugged into a USB 3.x powered USB hub, or directly into a USB 3.x port. My own personal experience can corroborate that the Cam Link does not work when plugged into a USB 2.0 port or hub and requires you to have it directly plugged into a 3.x USB port.
I was able to get it to work reliably when plugged into the USB 3.x port on the back of my Dell U2718Q monitor and have the USB upstream cable connected directly to a USB 3.x port on my MacBook.
Testing the video #
In order to test that the camera is working with the Cam Link 4K, open up Quicktime and create a “New Movie Recording” (File > New Movie Recording). This should open up a recording window which might show your Facetime camera by default, or whatever your default webcam is set to. If your camera is turned on, connected to the Cam Link 4K which is connected to you computer, then you should be able to select it as the “Camera” that Quicktime will use.
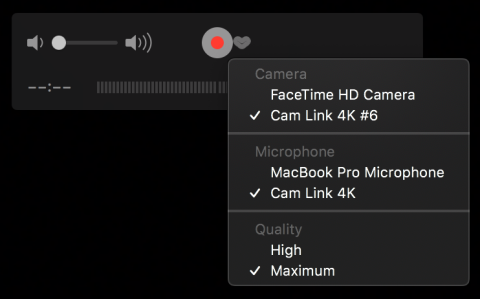
Quicktime camera and microphone selection
Mounting the camera for the best angle #
Generally speaking, getting the camera at or slightly above your eye line provides the best angle for remote meetings. This means we need to get the camera on top of, or above, the main screen you will be viewing. I have a dual-monitor setup so this meant getting the camera above my main monitor. To do this I employed the used of my single monitor desktop mount and removed the VESA mount from it. I then removed the mount that the VESA plat attaches to leaving a hole in the arm large enough to get a screw through and attach the monopod extension pole. Here is a video describing very similarly how it is done (without having to drill a larger hole as my monopod extension arm had a 1/4-20 thread and the screw for it fit through the hole without modification).
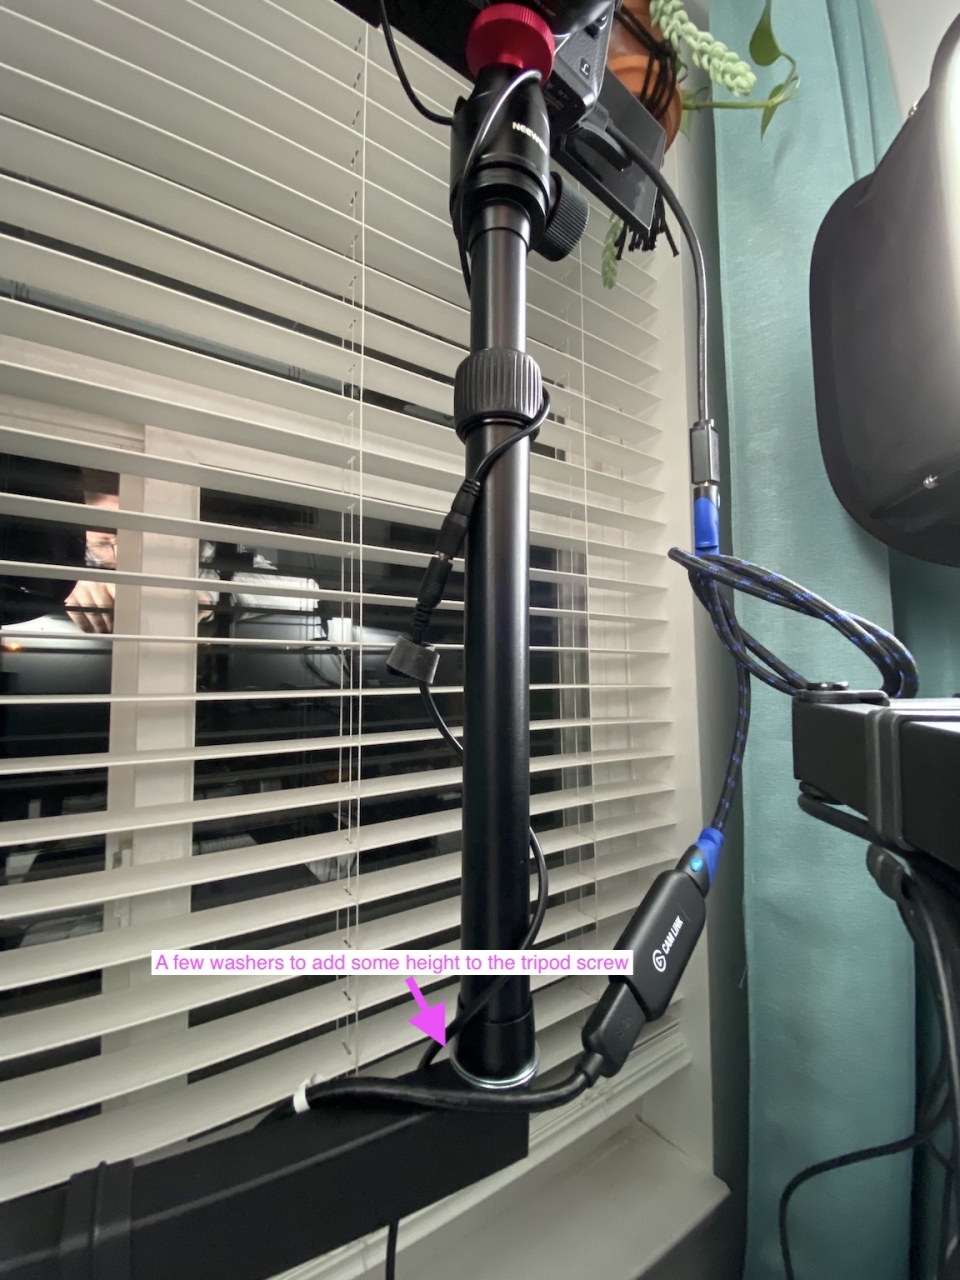
Monopod mounted to monitor arm, taken on iPhone 11 Pro in wide-angle mode
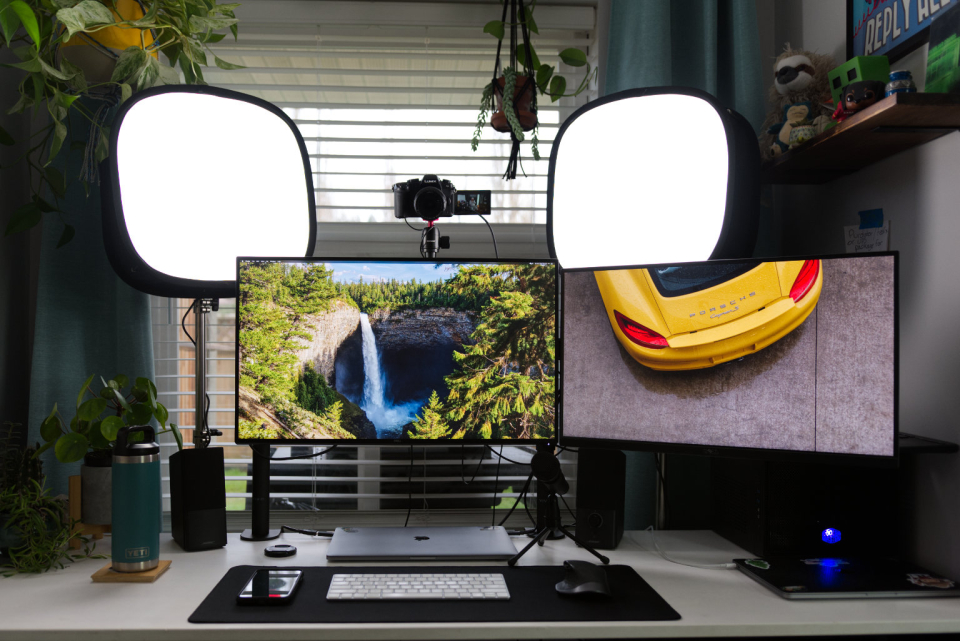
Final desk setup with camera mounted
Though I already had a set of friction arm mounts and used one temporarily to mount the camera while waiting for parts to arrive, this 11-inch adjustable articulating friction arm is the preferred purchase now should you choose to use this instead of the monopod extension mount.
Lighting #
Lighting is one of the most important aspects to achieving great video quality. I probably didn’t have to splurge and upgrade from the Logitech C920 because if I had a better control of my lighting, the camera sensor wouldn’t have to work so hard. A well-lit “scene” can be what makes or breaks it for your camera, and better lighting will always produce a better result, no matter the camera you use.
Three-point lighting is a standard method used in visual media that involves a key light (typically 45 degrees to the subject), fill light (typically 45 degrees to the subject opposite the key light, and can simply be a piece of foam board instead of an actual light), and a “back” or “hair” light (typically 45 degrees to back of the subject). Three-point lighting is definitely overkill for a project like this webcam setup, however we can borrow aspects of it to help address the lighting needs when in front of the camera and create a tight and narrow two-point lighting setup where both the lights we use are around 20–45 degrees from the subject (you) in front of the camera. If you have an office layout with a naturally lit window off to your left or right of your desk, then you can try a DIY two-point lighting setup with no lights and all you need is a reflecting disc.
The LED lights and diffusers that are used in this post were purchased previously and came with their own stands, AC adapters and cables, but not the diffusers (which I purchased later). If I were ordering them now, I would purchase some Elgato Key Lights. Alternatively, you could attempt to make your own.
An important aspect to keep in mind when picking lighting is that your lights should output a temperature that is close to natural daylight, of 5600K (kelvin). The reason for this is that it is a very bright and white light, rather than something close to 3200K or 3700K which can have a bit of an orange hue to it. Some LED panels are bi-colour, meaning they can output between 3200K and 5600K temperature.
Camera settings #
To ensure that you get the best quality video after you’ve lit the subject (you) properly, you’ll need to make some changes in the camera menus:
-
Make sure that the camera is not set on “Auto”, but rather on “Manual” on the mode dial on top. If your camera doesn’t have a dial, you may have to change it in the menu settings somewhere. Making this change will ensure that between light changing in your environment, subject movement (you moving around), etc. you won’t appear different colours or temperatures in the video feed.
-
After changing to “Manual” mode, depending on the frame rate you choose, you’ll need to set the shutter speed exactly (or as close as possible) to double the frame rate. An example of this is: if you pick
1080p60, your shutter speed will need to be double the frame rate of60which means you will set your camera shutter speed to1/125(most cameras don’t shoot at 1/120th of a second, so 1/125th of a second will do fine). If you pick1080p30, then your shutter speed will need to be 1/60th of a second. -
Make sure the ISO setting is as low as it can go, and gradually bump it up in order to properly expose yourself correctly. If you camera has a feature called “zebra stripes”, you can turn this on and set it to 75% to 90% to see which parts of your image become blown out and white. if you see a bunch of stripes on the screen, bump your ISO back down until there are very few stripes.
-
Ensure that you set the White Balance in the camera to a fixed colour temperature. With the lights I use being bi-colour, I set the white to 100% and the tungsten to 0%, and in my camera I set the white balance colour temperature to 5600K.
-
Pick if you want your camera to shoot with “continuous focus” turned on, or switch to “manual focus” to ensure the plane of focus never changes and you become out of focus if you move in your chair forward or backwards. Some cameras have cool features like “eye tracking” with continuous focus, and in a scenario like this where you’re pointing the camera at yourself it can be very useful!
Here are some great resources I recommend for learning about these topics as they apply to to DSLR/mirrorless cameras:
- https://blog.adobe.com/en/publish/2018/02/26/6-tips-still-photographers-learning-shoot-video
- https://www.adorama.com/alc/13-videography-tips-for-more-professional-looking-videos
- https://digital-photography-school.com/shoot-manual-mode-cheat-sheet-beginners/
Getting better audio #
Up until now, if you’re the kind of person who doesn’t have a need for an external computer monitor to supplement your MacBook screen, you’ve probably relied on your built-in microphone, or even used the built-in microphone on your external webcam (if you have one). Achieving better audio involves ditching those built-in devices and using an external microphone.
Something like a plug and play lavalier microphone which plugs into the mic port on your camera (if it has one) or the headphone port on your MacBook is vastly better than the built-in microphone. You could even get a USB microphone like this dynamic XLR & USB-c microphone, or this dynamic USB microphone, which plug directly into a USB port on your computer instead.
Any of these choices will significantly increase the quality of your voice! These microphones will make it easier for participants to hear you and can even produce some praise from them over how good your voice sounds. Marco Arment has a great article covering a wide variety of microphones that he has personally tested and provided feedback on for podcasting but all of which would work here.
You’re not limited to microphones either, you could simply purchase a USB wired headset and call it a day. For some, this might be more convenient than a dedicated microphone as well as you can wear it while having your hands free to type, and wherever you move your head it won’t affect the direction of your voice into the mic.
